Coulee Region Fieros
Serving Fiero lovers in the La Crosse and Eau Claire areas.
Torsion Bars: What is What and How to Change Them
If you have added a spoiler you may have noticed that your decklid doesn't stay up anymore. If will come flying up if you take the spoiler off, this can fix that also. That is because you have the wrong torsion bars. The torsion bars are two pieces of spring steel that force the decklid to stay up. They are under a lot of pressure and can break you or your back window. It you are careful it is not a problem. If you are not willing to take the chance, you can order a strut that will hold the decklid up at www.rodneydickman.com I am cheap and I knew where a set was in the junkyard, I paid $15. Unfortunately, the junkyard with the most Fieros in my area think they are something special and charge a lot for parts. Look at the table below to figure out what torsion bars you need. There will be some color sprayed on the bars that is what you are looking for. Also it is a lot easier if you have someone to help you, but you can do it alone.
|
Decklid equipment |
Color |
| Plain | Red |
| Luggage Rack | Blue |
| Spoiler | White |
Tools:
8 and 13 MM socket
Flat bladed screwdriver
12-18 inch piece of pipe with about an inch ID
1.5 x 1.5 x 4 inch wood block
(2) 12 x 12 x 1/2 - 3/4 inch piece of plywood or particle board
The sizes of the wood pieces and pipe can vary a little. I just found some scrap pieces that were about that size.
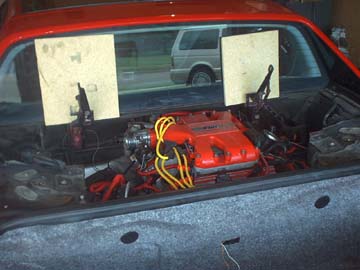
To begin you need to take the decklid off. To do this there are 4 13mm bolts that need to be taken out. These are the bolts going from the hinge to the decklid, NOT THE NUTS HOLDING THE HINGE TO THE FIREWALL. If you plan to reuse your hinges you can make a mark to aid in lining everything back up, I changed the whole hinge because mine had over spray on it from painting. You also need to disconnect the electrical connections in the decklid. There should be two or none. None if you done have the remote decklid button. Two if you do.
Now you need to take the battery out and the air intake tube and box. I then put the pieces of particle board in the rear window in case anything went wrong.
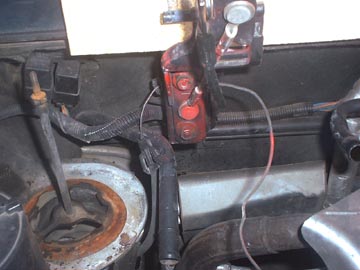
Now you can take the 4 nuts holding the hinge to the firewall off. After you have the nuts off you have to reach into the box that the hinges were mounted to. You should be able to grab a hold of the torsion bar and pull it towards you. When you do that you need to push the pin out. The pin goes through the side of the box and holds the torsion bars in tension. There are three sets of holes. I used the middle ones and it works fine. After you have done this you should be able to pop the torsion bars and hinges out of there. There is a little hook on the inside, side of the box that you need to get the torsion bars off of to get them out. Now carefully guide them out.
Now you need to take the hinges and torsion bars apart. If you look at the hinge you will see a round bolt with what looks like a torx hole, but it has a pin in the middle. There are three things you can do with this. A. You can chase around town until you find a store that sells the special bits. B. You can take a punch and hammer the crap out of the pin till it breaks off. C. You can use a vise grips and grab on to the head and take it off that way. I used the vise grips and got it off. There is some blue thread locker on there so I tapped it with a hammer a few times to break it up. I don't know if it helped but I go them apart. If you want to keep your hinges take them apart and take the new ones apart. If you don't want your hinges just take apart the new ones. The reason you need to take them apart is that the bars will not line up for the pins if you don't.
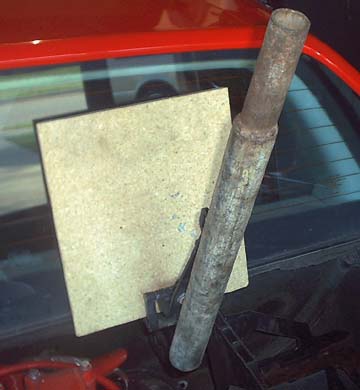
Yup, this is where the pipe comes in and the 1.5 x 1.5 x 4 inch piece of wood come in. It is also where a helper comes in handy. What you need to mount the torsion bars. Get it in the hook on the side of the box and get the pin put back in. Like I said the middle one worked for me but it is possible that they are different and it will not work for you. When it is all lined up put the pipe over the end of the torsion bar and push it down towards the engine. Slip the hinges over the bolts to the firewall and get the snug. Now for the 1.5 x 1.5 x 4 inch piece of wood. You need to push the torsion bar back toward the engine. You slip the 1.5 x 1.5 x 4 inch piece of wood between the torsion bar and the bottom of the hinge. I wish I had taken a picture of this but the batteries went dead in the camera. Now with the wood in between the torsion bar and the hinge you need to line the hinge and the torsion bar attachment holes up (where that funny little screw came out of.) Notice that there is a collar on the screw that needs to seat in the torsion bar. Line the holes up and screw that puppy in, by your desired method. Next put your decklid on. Line up the marks if you reused the hinges. If you did not GOOD LUCK! It took me an hour to get it lined back up right. You just have to play with it until it is right. Don't forget to reconnect the electrical stuff. Now your decklid will stay open on its own. Really it ended up being easier than I thought it was going to be, but be careful.
This information is used at the owners risk. Coulee Region Fieros or any of its members cannot be held responsible for any damage to yourself or property.